Featured Post Today
print this page
Latest Post
Showing posts with label All FRP Bypass. Show all posts

FRP Samsung J4 Frp Unlock Google Account Lock SM-J400 U5 By ZewelRana

 FRP Samsung J4 Frp Unlock Google Account Lock SM-J400 U5 By ZewelRana 

 
Google has added a security feature (Factory Reset Protection) to its Android OS. After the hard reset process, the OS asks you to enter the last Google account used in the phone before performing the factory reset to verify the identity of the real owner of the phone. This feature is important and is intended to avoid misuse of the device during thefts. But at the same time, some users have got into trouble because of it, when they have forgotten their GMAIL or password credentials after the hard reset. So, in this tutorial, we have brought the latest method to unlock FRP Samsung J4 Google Account Lock SM-J400 U5 easily by following some simple steps.
The FRP feature has been added to the phones that are available on the modern Android systems (Lollipop, Marshmallow, Nougat, Oreo, Pie), The process of bypassing FRP in the latest versions of Google’s Android is becoming challenging with every phone and every system and every version has a specific way to bypass this problem. 
Once you set up a Google Account in your Samsung J4, the FRP is active, so after performing a Factory Data Reset, you’ll be required to log in to the GMAIL username and password that you set up on the device, so if your Samsung J4 is stolen or lost, the device can’t be used. In that case, frpbypass.net will give an amazing way to the FRP unlocking process for your Samsung J4 mobile, you can get a safe FRP unlocking experience to your Samsung J4 device easily and smoothly.
The FRP bypass process available for free and you can use the FRP bypass app tool compatible with your device and we have brought the latest FRP Bypass APK which can help to bypass FRP on your Samsung J4 easily. 

Samsung Galaxy J4 Specifications

Samsung Galaxy J4 released in May 2018. Samsung Galaxy J4 comes with 2/3 GB RAM and 16/32 GB ROM. The Samsung Galaxy J4 has a 5.50 inches Super AMOLED LCD with a resolution of 720 x 1280 pixels, Samsung Galaxy J4 runs on Quad-core 1.4 GHz Exynos 7570 Quad chipset, and powered by a 3000mAh removable battery. The Samsung Galaxy J4 comes with 13-megaPixel on MAIN Camera and a 5-megaPixel on SELFIE Camera.

How to disable FRP (factory reset protection):

in your Samsung Galaxy J4 device, The FRP feature will automatically Enable as soon as you add a Google Account to your Samsung Galaxy J4. If you want to disable it, you just need to delete your account.

How to Bypass FRP Samsung J4

  • Power ON your Samsung Galaxy J4
  • Connect your Samsung mobile to your Wi-Fi.
  • Go back to the welcome page & click Lets GO ARROW.
  • Insert a sim card with a pin code, then click several times on Next.
  • Now remove the sim card then enter the PIN code.
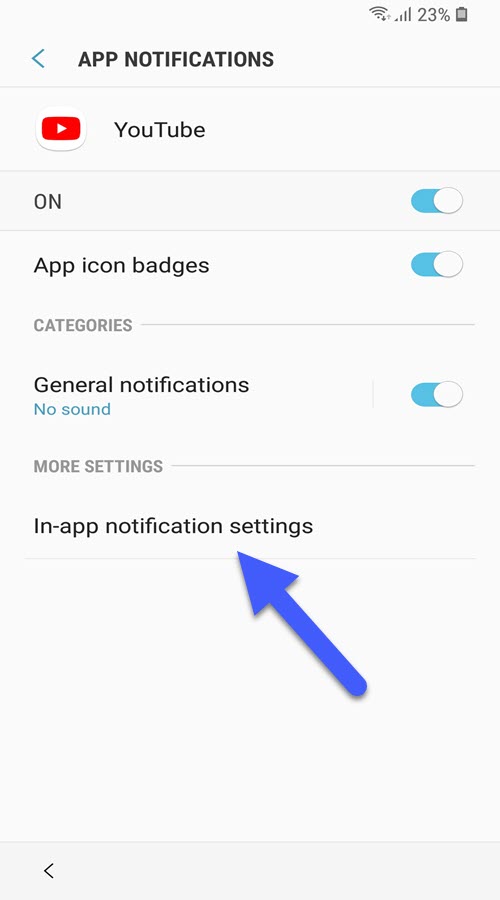
  • Be quick click on OK and click on the Lock logo then Tab on Notification setting 
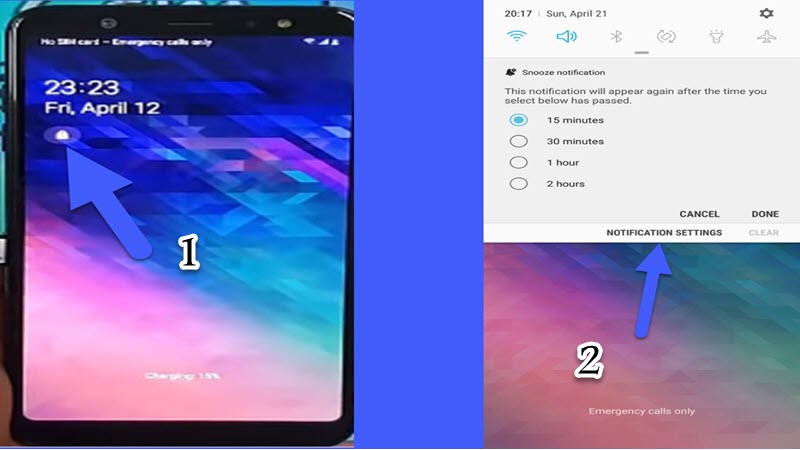
  • Scroll down Then tab on YouTube.
  • Click on In-app notification setting.
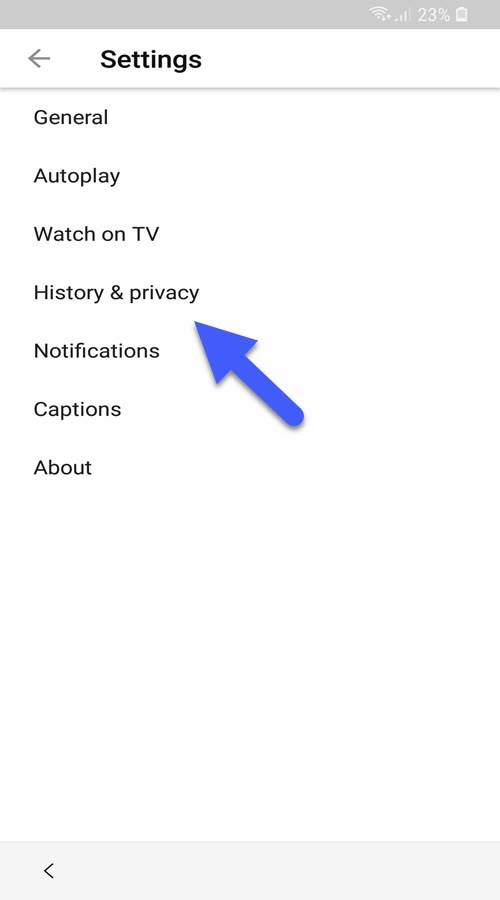
  • Tab on History & privacy.
  • Then click on YouTube Terms of Service.
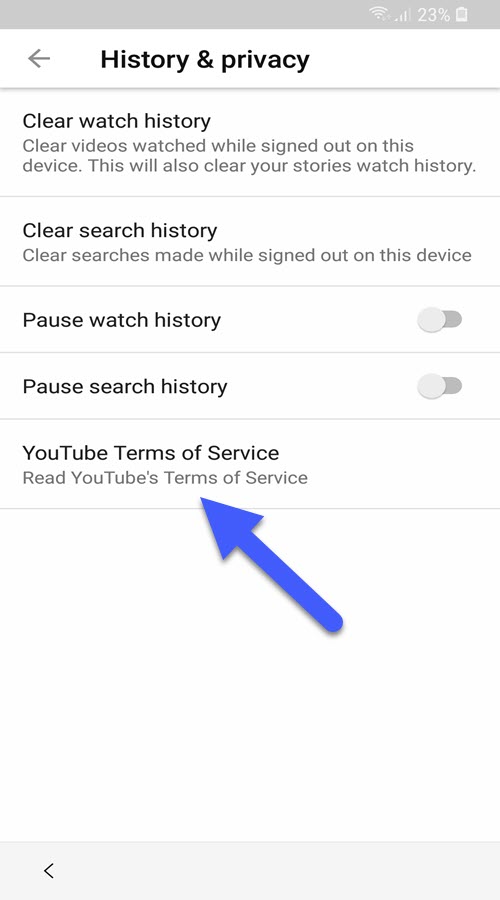
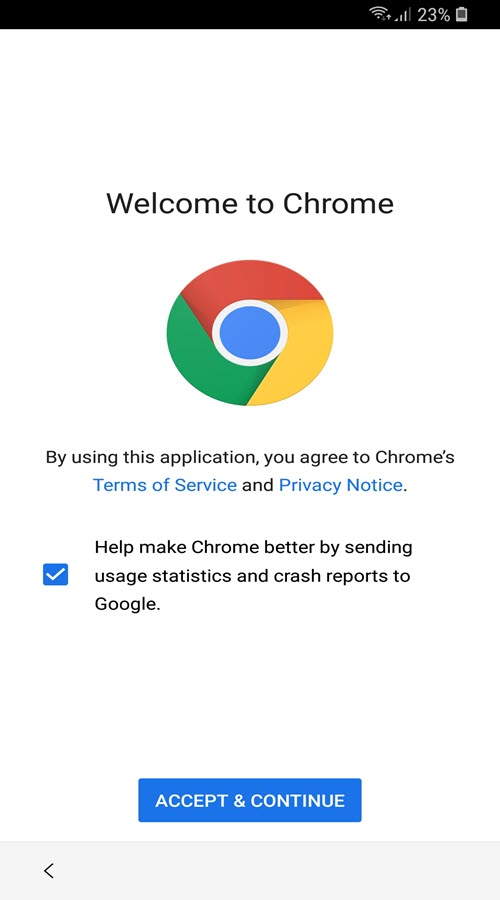
  • A Google chrome page appears on the screen.
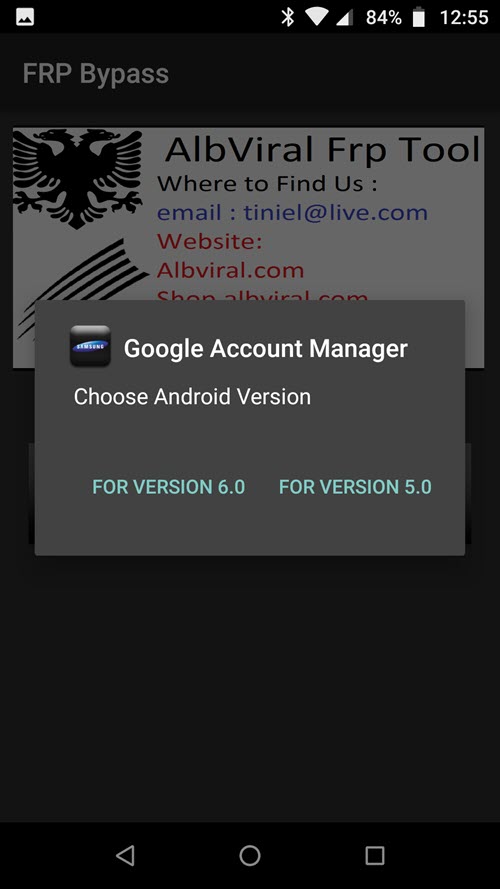
  • Click on Google Account Manager APK Install.
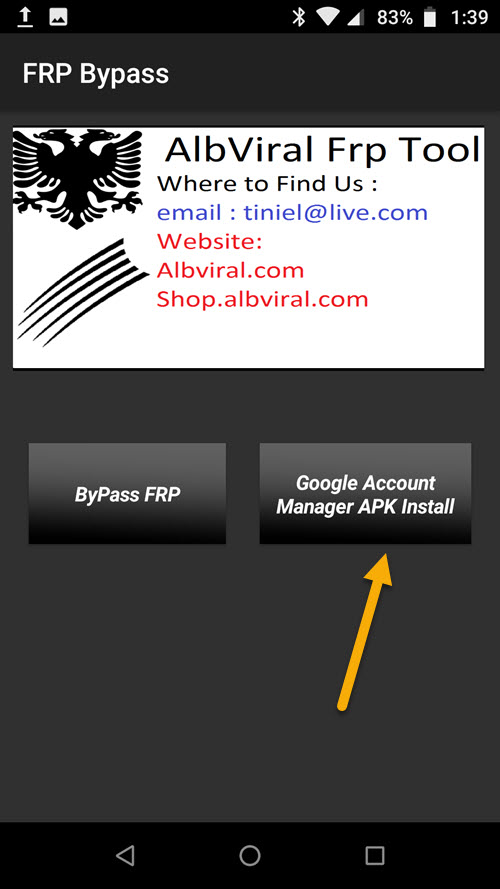
  • Choose Version 5.0 for Android 9 Pie.
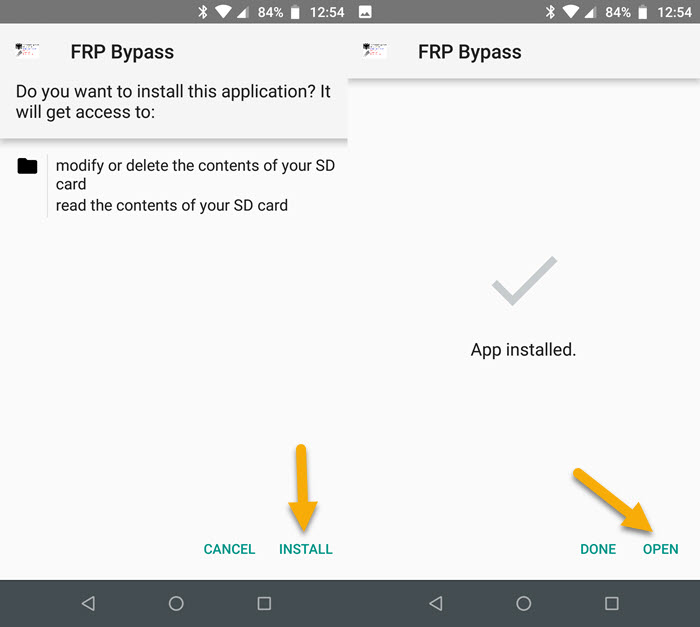
  • Then install Google Account Manager APK
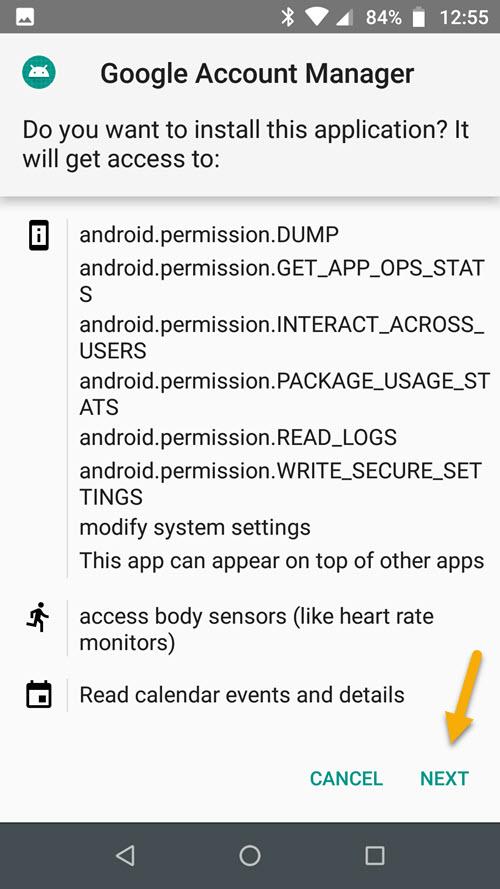
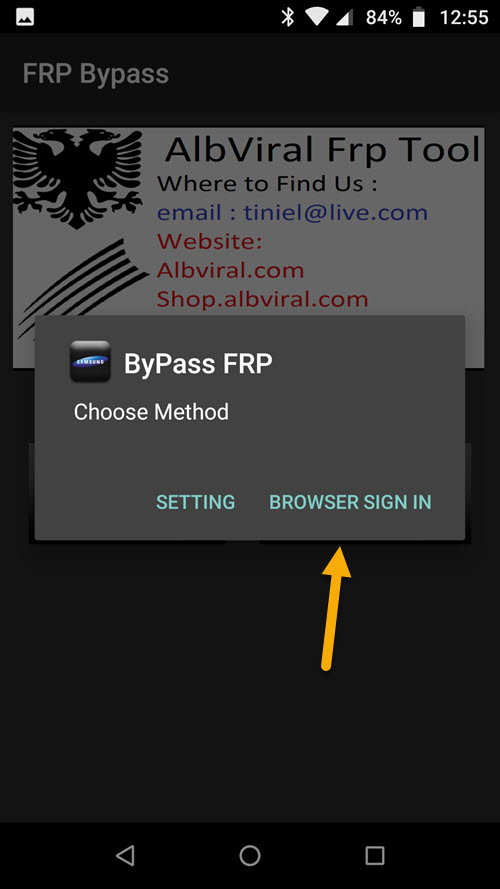
  • Go back to FRP Bypass app & tab on ByPass FRP
  • Click on BROWSER SIGN IN
  • Click on 3 dots upright & choose browser sign in
  • That’s it! Restart your Samsung J4 & you have successfully Unlock FRP Samsung J4 Google Account Lock SM-J400 U5.

0 comments

Huawei MediaPad M5 Remove FRP Google Account Lock Bypass

Huawei MediaPad M5 Remove FRP  Google Account Lock Bypass 


Google has added a security feature (Factory Reset Protection) to its Android OS. After the hard reset process, the OS asks you to enter the last Google account used in the phone before performing the factory reset to verify the identity of the real owner of the phone. This feature is important and is intended to avoid misuse of the device during thefts. But at the same time, some users have got into trouble because of it, when they have forgotten their GMAIL or password credentials after the hard reset. So, in this tutorial, we have brought the latest method to Remove FRP Huawei MediaPad M5 Google Account Lock Bypass easily by following some simple steps.
The FRP feature has been added to the phones that are available on the modern Android systems (Lollipop, Marshmallow, Nougat, Oreo, Pie), The process of bypassing FRP in the latest versions of Google’s Android is becoming challenging with every phone and every system and every version has a specific way to bypass this problem. if you can remember your Google account you can easily Remove FRP google account in your Huawei MediaPad M5, But if you forgot that it will be a little difficult to bypass the FRP.
Once you set up a Google Account in your Huawei MediaPad M5, the FRP is active, so after performing a Factory Data Reset, you’ll be required to log in to the GMAIL username and password that you set up on the device, so if your Huawei MediaPad M5 is stolen or lost, the device can’t be used. In that case, frpbypass.net will give an amazing way to the FRP unlocking process for your Huawei MediaPad M5 mobile, you can get a safe FRP unlocking experience to your Huawei MediaPad M5 device easily and smoothly.
The FRP bypass process available for free and you can use the FRP bypass app tool compatible with your device and we have brought the latest FRP Bypass APK which can help to bypass FRP on your Huawei MediaPad M5 easily.

Huawei MediaPad M5 Specifications:

Huawei MediaPad M5 released in February 2018. Huawei MediaPad M5 comes with 3/4 GB ram and 32/64/128 GB ROM. The Huawei MediaPad M5 has a 10/8 inches IPS LCD with a resolution of 2560 x 1600 pixels, Huawei MediaPad M5 runs on Octa-core 4×2.1 GHz & 4×1.8 GHz HiSilicon Kirin 960s chipset, and powered by a 5100/7500mAh non-removable battery. The Huawei MediaPad M5 comes with a single camera 13-megapixel MAIN Camera and an 8-megapixel on SELFIE Camera.
THE FRPBYPASS.NET CANNOT BE RESPONSIBLE  IF YOU’RE TRYING TO BYPASS FRP ON STOLEN PHONE.

How to disable FRP (factory reset protection):

in your Huawei MediaPad M5 device, The FRP feature will automatically Enable as soon as you add a Google Account to your Huawei MediaPad M5. If you want to disable it, you just need to delete your account.

Add a Google account on Huawei MediaPad M5:
Settings >>> Accounts >>> Add an account >>> Google.
Enter your Gmail account information.
Remove Google account on Huawei MediaPad M5:
 Settings >>> Accounts >>> Google.
Choose the added Gmail account.
Find Remove account by clicking the icon on the top right corner.

How to Bypass FRP Huawei MediaPad M5

  • Power ON your Huawei MediaPad M5.
  • Enter your Wi-Fi code then check Show advanced option.
  • Click on Proxy and choose Manual.
  • Write abcd.com in the Proxy hostname, and write 1234 in the Proxy port.
  • Click on the connect button, then click Next & wait until you see: couldn’t connect to the internet. 
  • Click OK then click Next.
  • Once you see No internet access, click on the red circle in the left
  • Tap on Learn More, then click on Next.
  • Now, select any country/region, then click on Start.
  • Click on the Search bar.
  • Search for bbbbbbbbbbbbbbbb to show Now matching results.
  • Click on the Email
  • Press & hold on the Gmail logo.
  • Choose Notifications then More settings
  • Tab on 3 Dots & choose Setting ==> Manage accounts ==> Accounts.
  • In the Setting go to System.
  • Tap on Reset.
  • Tab on Reset all settings.
  • Select Reset all settings.
  • Finally, Restart your Huawei MediaPad M5.
  • You have successfully Remove FRP Huawei MediaPad M5 Google Account Lock Bypass.
0 comments

FRP Bypass Huawei Nova 3i – Unlock FRP LOCK Huawei INE-LX1 ZewelRana

FRP Bypass Huawei Nova 3i – Unlock FRP LOCK Huawei INE-LX1 ZewelRana 

FRP Bypass Huawei Nova 3i 
Google has added a security feature (Factory Reset Protection) to its Android OS. After the hard reset process, the OS asks you to enter the last Google account used in the phone before performing the factory reset to verify the identity of the real owner of the phone. This feature is important and is intended to avoid misuse of the device during thefts. But at the same time, some users have got into trouble because of it, when they have forgotten their GMAIL or password credentials after the hard reset. So, in this tutorial, we have brought the latest method to FRP Bypass Huawei Nova 3i – Unlock FRP LOCK Huawei INE-LX1 easily by following some simple steps.
The FRP feature has been added to the phones that are available on the modern Android systems (Lollipop, Marshmallow, Nougat, Oreo, Pie), The process of bypassing FRP in the latest versions of Google’s Android is becoming challenging with every phone and every system and every version has a specific way to bypass this problem 
Once you set up a Google Account in your Huawei Nova 3i, the FRP is active, so after performing a Factory Data Reset, you’ll be required to log in to the GMAIL username and password that you set up on the device, so if your Huawei Nova 3i is stolen or lost, the device can’t be used. In that case, frpbypass.net will give an amazing way to the FRP unlocking process for your Huawei Nova 3i mobile, you can get a safe FRP unlocking experience to your Huawei Nova 3i device easily and smoothly.
The FRP bypass process available for free and you can use the FRP bypass app tool compatible with your device and we have brought the latest FRP Bypass APK which can help to bypass FRP on your Huawei Nova 3i easily. 

Huawei Nova 3i Specifications:

Huawei Nova 3i released in July 2018. Huawei Nova 3i comes with 4/6 GB ram and 64/128 GB ROM. The Huawei Nova 3i has a 6.30 inches IPS LCD with a resolution of 1080 x 2340 pixels, Huawei Nova 3i runs on Octa-core 4×2.2 GHz & 4×1.7 GHz Hisilicon Kirin 710 chipset, and powered by a 3340mAh non-removable battery. The Huawei Nova 3i comes with a Dual camera 16-megapixel + 2-megapixel MAIN Camera and Dual 24-megapixel + 2-megapixel on SELFIE Camera.
THE FRPBYPASS.NET CANNOT BE RESPONSIBLE  IF YOU’RE TRYING TO BYPASS FRP ON STOLEN PHONE.

How to disable FRP (factory reset protection):

in your Huawei Nova 3i device, The FRP feature will automatically Enable as soon as you add a Google Account to your Huawei Nova 3i. If you want to disable it, you just need to delete your account.

Add a Google account on Huawei Nova 3i:
Settings >>> Accounts >>> Add an account >>> Google.
Enter your Gmail account information.
Remove Google account on Huawei Nova 3i:
 Settings >>> Accounts >>> Google.
Choose the added Gmail account.
Find Remove account by clicking the icon on the top right corner.

Links:

How to Bypass FRP Huawei Nova 3i

  • You need an SD card with 8 GB space.
  • Now download the Downgrade firmware for your Huawei Nova 3i
  • Create a new folder in your SD card, and rename it to dload & Unzip the downloaded firmware zip file.
  • Dial *#*#2846579#*#*
    • software upgrade ==>sd card update and the update should start
  • If code does not work, then press & hold the volume up + The volume down first then press the power button and keep pressing all together.
  • Your phone will detect the package and will start the update process automatically.
  • The first boot may take up to 5 minutes so be patient.
  • Now you need to Hard reset your Huawei Nova 3i mobile:
    • Press & Hold Volume Up + Power buttons until you see Huawei Logo.
    • In the Hard reset Page choose wipe data/factory reset using Volume buttons, and tap on Power button to confirm
    • Then choose wipe data/factory reset.
    • Wait until the hard reset process finishes.
  • Once the hard reset ends to select the Safe Mode option using Volume buttons, and tap on the Power button to confirm.
  • Once the Huawei Nova 3i turns on in Safe mode Go to Setting ==> System.
  • Tap on Reset.
  • Tab on Reset all settings.
  • Select Reset all settings.
  • Finally, Restart your Huawei Nova 3i.
  • You have successfully FRP Bypass Huawei Nova 3i – Unlock FRP LOCK Huawei INE-LX1.
0 comments

How To FRP Bypass Xiaomi Redmi K30 | FRP Unlock Android 10 MIUI 11 ZewelRana

 How To FRP Bypass Xiaomi Redmi K30 | FRP Unlock Android 10 MIUI 11 ZewelRana 

Bypass FRP Xiaomi Redmi K30 
Google has added a security feature (Factory Reset Protection) to its Android OS. After the hard reset process, the OS asks you to enter the last Google account used in the phone before performing the factory reset to verify the identity of the real owner of the phone. This feature is important and is intended to avoid misuse of the device during thefts. But at the same time, some users have got into trouble because of it, when they have forgotten their GMAIL or password credentials after the hard reset. So, in this tutorial, we have brought the latest method to Bypass FRP Xiaomi Redmi K30 | FRP Unlock Android 10 MIUI 11 easily by following some simple steps.
Once you set up a Google Account in your Xiaomi Redmi K30, the FRP is active, so after performing a Factory Data Reset, you’ll be required to log in to the GMAIL username and password that you set up on the device, so if your Xiaomi Redmi K30 is stolen or lost, the device can’t be used. In that case, frpbypass.net will give an amazing way to the FRP unlocking process for your Xiaomi Redmi K30 mobile, you can get a safe FRP unlocking experience to your Xiaomi Redmi K30 device easily and smoothly. 
The FRP bypass process available for free and you can use the FRP bypass app tool compatible with your device and we have brought the latest FRP Bypass APK which can help to bypass FRP on your Xiaomi Redmi K30 easily.
The FRP feature has been added to the phones that are available on the modern Android systems (Lollipop, Marshmallow, Nougat, Oreo, Pie), The process of bypassing FRP in the latest versions of Google’s Android is becoming challenging with every phone and every system and every version has a specific way to bypass this problem. 

Xiaomi Redmi K30 Specifications

Xiaomi Redmi K30 released in December 2019. Xiaomi Redmi K30 comes with 6/8 GB RAM and 64/128/256 GB ROM. The Xiaomi Redmi K30 has a 6.67 inches IPS LCD with a resolution of 1080 x 2400 pixels, Xiaomi Redmi K30 runs on Octa-core 2×2.2 GHz Kryo & 6×1.8 GHz Qualcomm SDM730 Snapdragon 730G chipset and powered by a 4500mAh non-removable battery. The Xiaomi Redmi K30 comes with a QuadMAIN camera 64-megapixel + 8-megapixel + 2-megapixel + 2-megapixel and a Dual 20-megapixel + 2-megapixel on SELFIE Camera.
THE FRPBYPASS.NET CANNOT BE RESPONSIBLE  IF YOU’RE TRYING TO BYPASS FRP ON STOLEN PHONE.

How to disable FRP (factory reset protection):

in your Xiaomi Redmi K30 device, The FRP feature will automatically Enable as soon as you add a Google Account to your Xiaomi Redmi K30. If you want to disable it, you just need to delete your account.

How to FRP Bypass Xiaomi Redmi K30

  • Power ON your Xiaomi Redmi K30.
  • Choose any language the choose any region.
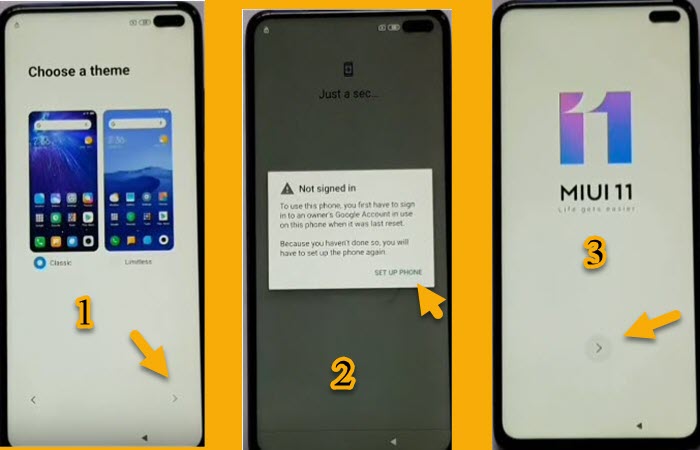
  • Click on Skip ==> Next ==> Next.
  • Click on Accept.
  • Now, Set up a new Fingerprint ==> Pattern.
  • Draw unlock Pattern ==> Add your fingerprint.
  • Fingerprint added successfully.
  • You stuck on Not signed in message again.
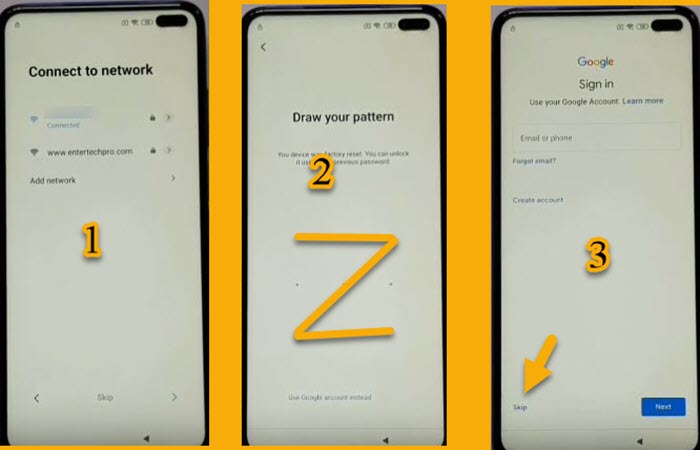
  • Now Connect your Xiaomi Redmi K30 to your Wi-Fi.
  • Draw your pattern that you set up early then click on Skip.
  • That’s how you can Bypass FRP Xiaomi Redmi K30 | FRP Unlock Android 10 MIUI 11.
IF YOU HAVE ANY DOUBTS OR FACE ANY KIND OF PROBLEM WITH THIS METHOD, COMMENT BELOW.
0 comments

How To FRP Bypass Samsung J3 V / Gmail Lock Bypass Android 8.0.0 Oreo ZewelRana

 How To FRP Bypass Samsung J3 V / Gmail Lock Bypass Android 8.0.0 Oreo ZewelRana 

Bypass FRP Samsung J3 V 
Google has added a security feature (Factory Reset Protection) to its Android OS. This feature is important and is intended to avoid misuse of the device during thefts. But at the same time, some users have got into trouble because of it, when they have forgotten their GMAIL or password credentials after the hard reset. So, in this tutorial, we have brought the latest method to Bypass FRP Samsung J3 V / Gmail Lock Bypass Android 8.0.0 Oreo easily by following some simple steps.
Once you set up a Google Account in your Samsung J3 V, the FRP is active, so after performing a Factory Data Reset, you’ll be required to log in to the GMAIL username and password that you set up on the device, so if your Samsung J3 V is stolen or lost, the device can’t be used. In that case, frpbypass.net will give an amazing way to the FRP unlocking process for your Samsung J3 V mobile, you can get a safe FRP unlocking experience to your Samsung J3 V device easily and smoothly. 
The FRP bypass process available for free and you can use the FRP bypass app tool compatible with your device and we have brought the latest FRP Bypass APK which can help to bypass FRP on your Samsung J3 V easily.
The process of bypassing FRP in the latest versions of Google’s Android is becoming challenging with every update and every new device. 
Samsung Galaxy J3 V Specifications:
Samsung Galaxy J3 V released in June 2018. Samsung Galaxy J3 comes with 2 GB RAM and 16 ROM. The Samsung Galaxy J3 V has a 5.00 inches IPS LCD with a resolution of 720 x 1280 pixels, Samsung Galaxy J3 V runs on Quad-core 1.4 GHz Exynos 7570 Quad chipset, and powered by a 2600mAh removable battery. The Samsung Galaxy J3 V comes with an 8-megapixel MAIN Camera and 5-megapixel on SELFIE Camera.

Remove FRP Samsung J3 V:

1- Power ON your Samsung J3 V
2- Connect your Samsung mobile to your Wi-Fi.
3- Press 3 time on Home button to Turn ON TalkBack
4- After talkback tutorial appears, swipe the letter L on the screen
5- Then double tab on TalkBack Setting
6- Press 3 time on Home button to Turn OFF TalkBack
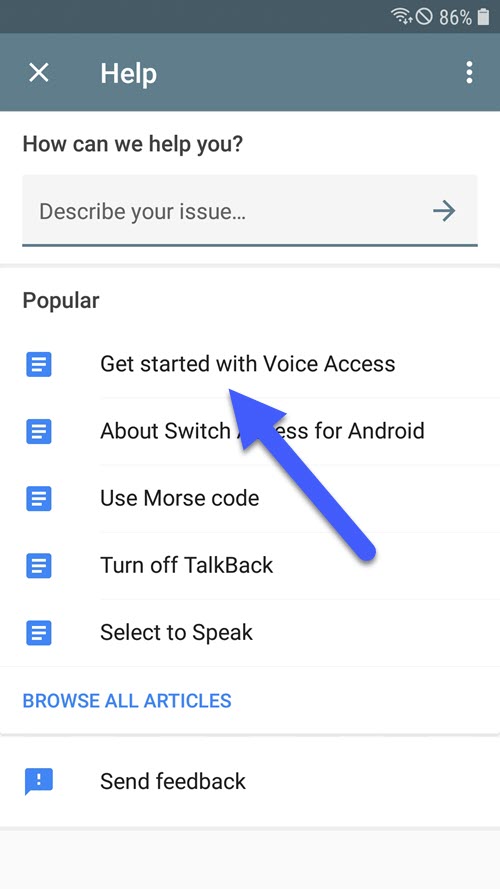
7- Then Tab on help & feedback
8- Tab on Get started with Voice Access & click on the video to play it on the youtube app.
9- Click on Account === Terms & privacy policy
10- The Internet browser will open automatically
11- Download, install & open FRP Bypass app
12- Click on Google Account Manager APK Install.
13- Choose Version 5.0 for Android 8
14- Then install Google Account Manager APK
15- Go back to FRP Bypass app & tab on ByPass FRP
16- Click on BROWSER SIGN IN
17- Click on 3 dots upright & choose browser sign in
18- Sign in with your Gmail address & confirm.
19- That’s it! Restart your Samsung J3 V & you have successfully Bypass FRP Samsung J3 V / Gmail Lock Bypass Android 8.0.0 Oreo.
0 comments
 
Support : My Channel YouTube | Johny Template | Mas Template
Copyright © 2011. FRP Bypass24.com - All Rights Reserved
Template Created by Creating Website Published by Mas Template
Proudly powered by Blogger